Archive for February, 2007

Changing your Windows XP Product Key

Its not very often I have to do this, but sometimes I do because I end up purchasing a bunch of matching machines, loading the software onto one, and ghosting to the rest.

So here’s a short guide on how to change your Windows XP serial number or product key.

Here’s the batch file I created to achieve the task. Simply create a new file called “changekey.bat”, and enter the following:

@echo off
echo.
echo Select “Yes I want to telephone a customer service representative to activate windows”,
echo click “Next”, then click “Change Product Key”, now enter your new key, then click “Update”.
@echo REGEDIT4 > %TEMP%\oobetimer.reg
@echo [HKEY_LOCAL_MACHINE\SOFTWARE\Microsoft\Windows NT\CurrentVersion\WPAEvents] >> %TEMP%\oobetimer.reg
@echo “OOBETimer”=hex:ff,ff,ff,ff,ff,ff,ff >> %TEMP%\oobetimer.reg
@regedit /s %TEMP%\oobetimer.reg
@del %TEMP%\oobetimer.reg
%SYSTEMROOT%\system32\oobe\msoobe /a

That’s it!

change_winxp_key.txt

Comments (1)

Free Stuff

I love free stuff, it’s probably why I like open source so much…

I think we must all like free stuff, so I have decided to gather a few sites together that offer up-to-date free stuff.

There’s all sorts of junk you can get for free, mostly by filling in a form online with your details.

There are usually limited ties too, most of the time its purely a case of a product awareness campaign.

Here are a few sites you can try:

  • TheFreeSite.com – This site has been around for years, probably the most renowned. However it does seem to have grown quite uncontrollably large, offers free online services as well as products, lacks frequent updates, and is targeted at the US population. (US based)
  • Freebie Forum – This forum has over 1500 active members. You can usually find free stuff fairly quickly. (UK)
  • Bob’s Free Stuff Forum – A very cool populated forum, offering live up-to-date stuff for free. There’s over 10,000 members on this forum. (UK)
  • Money Saving Expert.com Freebies – This is a heavily populated forum by people always looking to save money, you can expect to find good stuff as soon as it’s known here. (UK)
  • FreeUKStuff.com – Kinda cool, offers you quite a good selection, you can make comments too, but you must be a member, membership is free. (UK)
  • freebiesblog.net – Freebie blog site. (US based)
  • FreeStuffChannel – Freebie site with RSS feed. (US based)
  • FreeGrabber – Another freebie site blog with RSS feed. (US based)
  • Free Stuff Exchange Forum – This is only a small forum, but can sometimes offer some good stuff. (UK)
  • Free-Stuff – A site updated 3 times per week apparently. (UK)
  • Freebiersclub – Members only, but its pretty awsum! (UK)
  • Free Stuff Junction Site List – A list of freebie sites. (UK)
  • Find more free stuff on DMOZ

Enjoy your free junk!

1136377208

Comments (3)

PSP firmware and homebrew

I decided to go all out, and purchase possibly the best media device out there. The Sony Playstation Portable.

Don’t get me wrong, the thing that appealed to me most about the PSP was the fact it could connect to the internet via WIFI.

My first question was “I wonder what else this can do”.

After a quick search I began to find lots of details on the PSP, including details on homebrew applications.

I soon discovered that the homebrew software would only run on certain firmware versions of the PSP.

I checked out the firmware version on my PSP and discovered it was running firmware ’2.50′.

One thing I quickly learned was NOT to upgrade to the latest 3.11 firmware provided by Sony using the Network Update. In fact if you wish to use any homebrew software ever, its recommended that you do not upgrade past 3.03 of the regular firmware provided by Sony.

I also discovered that someone under the name of “Dark_Alex” had written a homebrew firmware known as “open edition”, which is effectively a modified version of the official sony firmware.

I discovered that to install the very latest (which is 3.10 OE A’ at the time of writing) I needed firmware 1.50 installed on my PSP. I discovered that the reason for this is that this firmware is the most flexible, known in the PSP homebrew scene as the golden firmware.

I began investigating various “downgrading” methods. It seems that there is only one way to downgrade from firmware 2.50/2.60 and that is to own an unpatched version of “GTA: Liberty City Stories”, which contains firmware 2.00, which you can downgrade to. Unfortunately I do not have this game.

I discovered that there was another way. I could use a game I have which contains firmware 2.71, and downgrade using an auto installer from that firmware to firmware 1.50, this was the best option.

The game I used was called “The Ark of Napishtim”, which contained “PSP Update ver 2.71″, that allowed me to upgrade from firmware 2.50 to firmware version to 2.71.

Once I had 2.71 successfully installed I simply located a copy of “Downgrader2.71FULL.exe“, run this and follow the on-screen instructions. (PS, the part that talks about the red screen, if you don’t get the red screen, restart your PSP and keep trying, it works eventually).

Once I had successfully downgraded to firmware 1.50, I was able to use “3.10 OE-A Winstaller.exe” to upgrade to the latest open edition homebrew firmware.

The great thing about the open edition firmware is it allows you to run any PSP homebrew software under the latest firmware by putting it in your regular GAME folder, or as the 1.50 firmware by placing it in a folder named GAME150. This also means you are always able to downgrade from the latest homebrew firmware to firmware 1.50.

The next thing to do was to upgrade to 3.10 OE A’ (rev A2) homebrew firmware, which has some minor bug fixes. Its simply a case of downloading this, extracting, placing the directory in the GAME folder on your PSP/flash card, and running it on your PSP.

Also see PSP-Vault.com for more information on PSP firmware and homebrew. They have some fantastic graphs and more useful information.

Thanks to this I was able to try out the following homebrew software:

  • PSP Radio – I have so far been unable to connect this to my WIFI
  • PSPVNC – This thing is great, I can view my PC from anywhere in my house!
  • Pimp Streamer – This thing is amazing! You can stream your media from your PC onto your PSP

One thing I must point out is that I DO NOT support or promote piracy, if you like the games buy them.

Piracy is the reason Sony has locked down their recent firmware so you are unable to run homebrew software. It’s a real shame that Sony’s paranoia about piracy means that PSP owners are unable to write or use homebrew software applications on devices that run the latest firmware.

Comments (8)

Fixing a faulty laptop DC jack connector

I was recently informed that my old laptop, a HP Pavilion ze4111s, (now being used by my girlfriend) that “it doesn’t charge”, which then changed to “it sometimes does, and other times it doesn’t”.

I decided to investigate and began wiggling the AC adaptor at the back in the DC jack socket, which appeared to become lose.

My next idea was to take the laptop apart to take a closer look at the DC jack to see where the problem lay.

The first thing I did was to find the service and maintenance manual on the manufacturers website. I managed to locate the Service and Maintenance manual for the HP Pavilion 4100 series in PDF form, this document can be used for many other laptops as they are all built in a very similar way.

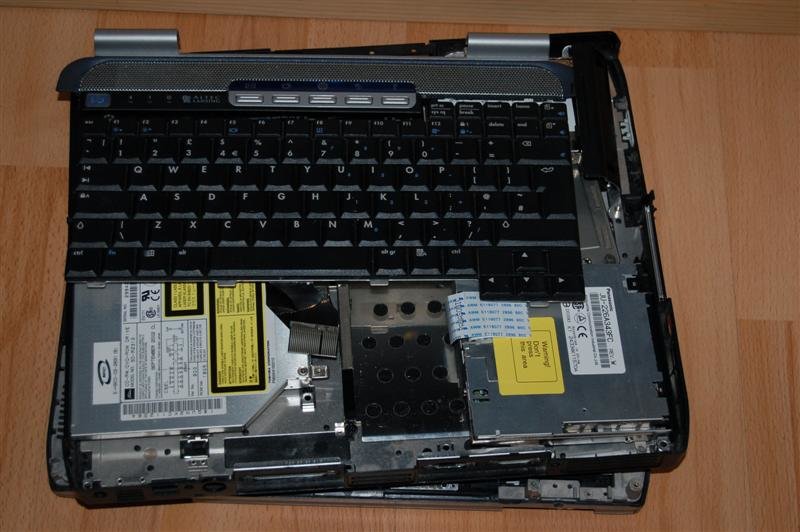
I began following the instructions for “removing the motherboard”, which requires following the instructions for removing other parts first. This is a long process, and can take some time.

To make sure I knew which screws were for what and where, I took a few empty egg boxes, and labelled them as I put the screws in. This will make it easier to locate the right screws when I reassemble the laptop.

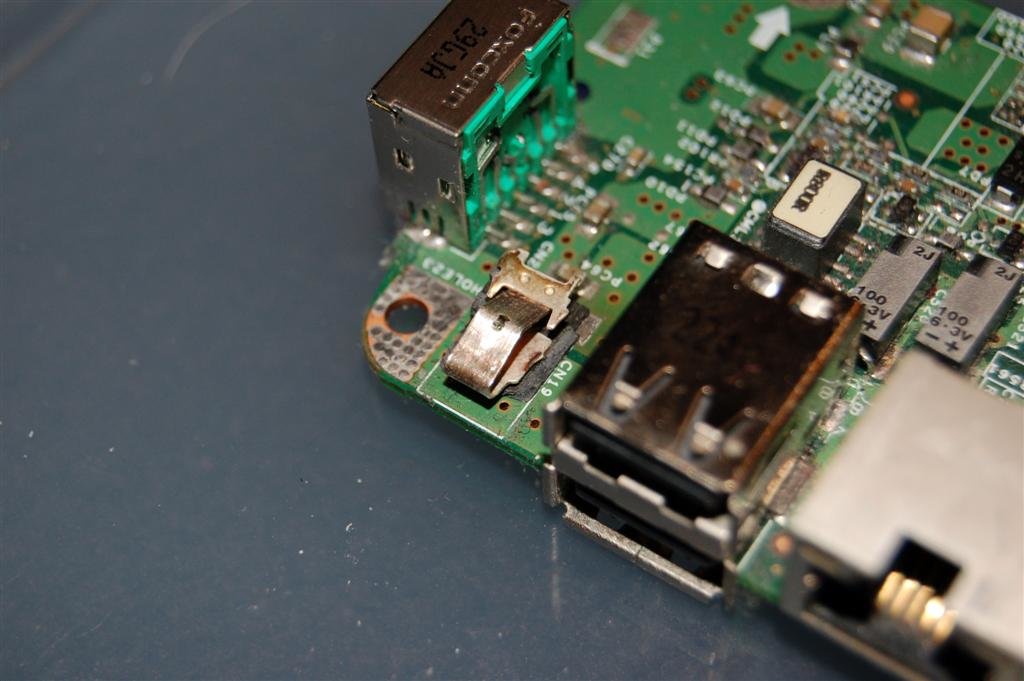
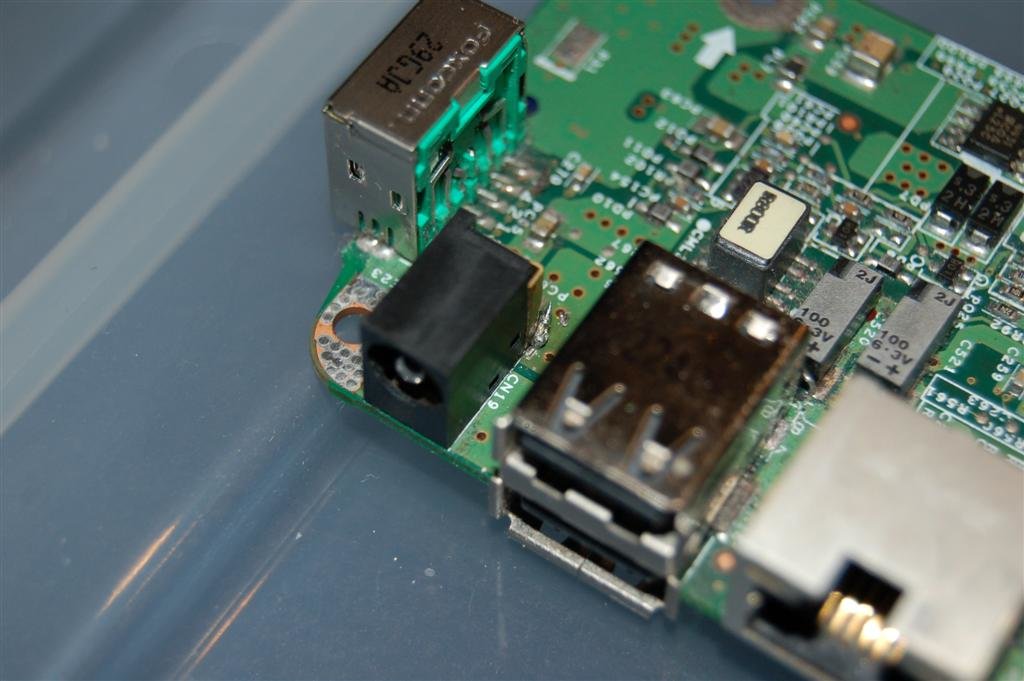
After spending some time to get to the motherboard and safely remove it, low and behold the connector had come away from the motherboard, but was sometimes still touching hence why sometimes it worked and other times it did not.

I also discovered that the housing had cracked, and with a little wiggle the top came off, and I could now see the exact problem.

HP Pavilion ze4111s broken DC jack

My next step was to work out what to do next with this laptop. This laptop is quite old, and is most definitely outside its warranty period. However I knew what the problem was and had a few ideas on how to fix it.

I decided to contact HP for their suggestions, and while I waited I searched eBay for a supplier of parts for the ze4111s, I located a company who had some parts. I contacted them about getting a replacement motherboard for the laptop, and they suggested that the replacement would be £60. To me that is excessive, probably about 1/3 of the total value of the laptop, it’s not worth it.

I finally got hold of someone at HP, who suggested I contact a service centre, who I found out, charge an absolute fortune! I explained to them that it would not be worth my while and besides I know what the problem is.

I tried resoldering the connector from the housing of the DC jack to the motherboard, but the moment I put the AC adapter into the DC jack the housing would break and force the connection to break.

HP Pavilion ze4111s broken DC jack resolder

Upon further examining the motherboard, I discovered that the jack could be safely removed from the motherboard providing I could unsolder it from the underneath where it connects to the motherboard in three places. Not a problem, I’d just require a replacement jack.

I went on to explain this to the HP contact, who provided me with the following details:

I would like to inform you that as per HP policies if the issue is with
power jack then you have to replace the motherboard. However, for your
information I would like to say that the Power Jack on some Notebook
models can be replaced. So, please visit the following Web site to to
know more information about the power jack on the Notebook:

http://www.compaqrepair.com/guide/Compaq_motherboard_ac_power_jacks.htm

OR

http://www.laptopjacks.com/service.php

OR

http://www.aacomputerelec.com/categories.asp?cat=8

NOTE: The URLs above will take you to a non HP Web site. HP does
not control and is not responsible for information outside
of the HP Web site.

Once you visit the We site, contact support of the web site and check
for the availability of the power jack for your model.

Then take the notebook to nearest Local Service Center and get the power
jack replaced.

This was most helpful, I discovered that clearly it can be done, and there are replacements out there!

I also found this thread, and figured that if this guy could do it, I could do it too.

I found that the sites above were charging a fortune for the replacement jack, so I checked all my usual suppliers for components including Maplin, no such luck.

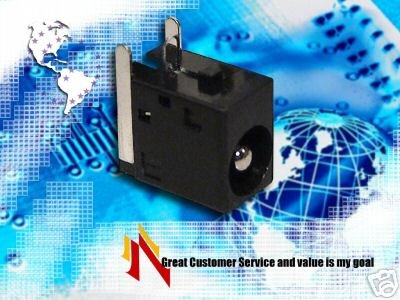
Then, a brainwave, I could cross reference google with eBay and see if anyone had mentioned a jack for a ze4111s recently. So that’s what I did, and soon discovered the seller “laptop18000“, and their shop “GOOD DEALS IN” based in the USA, but sells DC jacks for laptops for very cheap compared to the previous offers.

DC Power Jack for HP Laptop motherboard XL XF XZ HP ZE

“Sounds good to me!”

From here its simply a case of de-soldering the old connector from the motherboard, soldering the new connector, then putting the laptop back together. Problem solved!

Meanwhile, the laptop remains in pieces…

HP Pavilion ze4111s

In conclusion, don’t throw your laptop away, don’t pay excessive amounts getting someone autherised by HP to fix it, don’t pay more than you have to. DO IT YOURSELF!

Comments (15)

IHTOOM pmp

Despite my problems with purchasing mp4 players in the past I decided to purchase a new one.

This time I found a good one from a reputable website that sold items from China across the world, instead of eBay.

This device is also known as the Black Hawk MP4 Digital Player or mini Play Station Portable or IHTOOM personal media player.

Read the rest of this entry »

Comments (117)

How to Print to a Text File

Device Manager does not have a Save command available for you to save a report to a text file. To save a Device Manager report to a text file, you must install a generic, text-only printer, and then redirect the Device Manager report to this printer.

To print to a text file:
1. Click Start, and then click Printers and Faxes.
2. Click Add a Printer, and then choose the following options in the wizard:
a. Click Local Printer.
b. Click to clear the Automatically detect and install my Plug and Play printer check box.
c. Click Use the Following Port, and then click FILE (Print to file).
d. Click Generic in the Manufacturer box.
e. Click Generic / Text Only in the Printers box.
f. Name the printer.
g. Click Do not share this printer.
h. Click No when you are prompted to print a test page.
3. When you click the printer in the Print dialog box, Windows prompts you for a file name.

Done!

print_to_txt.txt

Comments (2)

Siemens CX65 Review

I bought this on the 20/08/04 for £179.99, which actually seems quite a lot for such a phone, but it was not bad at the time for a brand new unlocked phone.

Siemens CX65 Mobile Phone

I decided to get this phone as I had a Siemens ME45 before and that was great for it’s time.

In my opinion, this phone had a very stylish design. It was one of few non-flip phones on the market as they appeared to be becoming the norm. I have always been under the impression that like small convertibles, they are girlie.

The features I particularly liked when I purchased this phone were the custom polyphonic ring tones, vibrate, IRDA, build-in camera for photos and video, navigation joystick, integrated antenna, loudspeaker, “dynamic lights” for alerts, full colour display, video playback, silent mode and the ability to sync with Microsoft Outlook.

At the time of it’s release cameras were begining to become established in phones and were now the standard, as such this phone even came with an optional flash which plugged into the bottom. Quality of photos and video is reasonable.

Obviously it also came with standard features such as SMS, MMS and Internet/WAP, oh and of course the ability to make and receive calls.

As you can tell, this phone is pretty feature-tastic, the only thing it is missing from it’s elegant design is bluetooth. To begin with this didn’t matter as no one had bluetooth either, but as more and more phones came with bluetooth as standard, this phone got left behind.

Regardless, this is a fantastic phone. One of the best things is the navigation. Finding anything was easy, and once you were in it, it was easy to use. Text messages supported T9, which was really simple to work with, compared to other phones.

I also loved the management options such as copy and paste, and the phone number highlighting so you can dial a number you are sent with ease.

One of my favorite features was the dynamic lights. These are used when you receive a missed call or a text message to continually alert you that you have to attend to it, without continuously releasing a distressing noise like other phones, otherwise known as silent alerts. You are able to turn off the dynamic lights feature.

This phone also comes with some useful applications such as calculator (which is difficult to use), calendar, notes, task, dictating, stop watch, count down, unit converter, alarm clock, media player and all sorts of other software functions I would probably never get around to using, but at least I know they are there.

Another great feature of this phone was its ability to run java. This meant you could easily get hold of, and install new applications and new games to extend the possibilities of this phone.

Although this phone has quite a bit of storage space, for some strange reason, it could only seem to manage 100 text messages on the phone, and the standard 10 on the sim card. I never worked that out.

One thing I did find useful, was the ability to sync with outlook. Although to begin with the software that came with the phone wasn’t very good, Siemens released new software which was far better. Also the data connection was serial not USB, this meant your power was drained very quickly.

The benefit of this though was that I was able to use SCMxx, which is command line based communication software which I used for sending text messages from my computer without having to type with my thumb on my phone or use bulky software.

However, I think this is going to be the last Siemens I buy, and is almost definately the last of its kind, as on 07/06/05 Siemens AG (Siemens Mobile) announced it was being bought by BenQ (formerly Acer), but it all spells trouble for me, and as far as I can see it is a struggling company, and is having difficulty competing in today’s market. It is only a matter of time before its is bankrupt.

Conclusion: This was a great phone and simply lacked bluetooth, it’s time to move on.

More: Siemens CX65

Comments (1)

Mounting an ISO image

An ISO image usually refers to an archived copy of an optical disc such as a CD or DVD.

You would usually experience such files if you downloaded a full CD copy of an application or a bootable CD.

Other circumstances are if you would like to use a CD without having it physically in the drive, you can do this by creating a virtual drive, using an emulator.

The general term for software that can do this is called a “disk image emulator”, and there are a few out there to choose from.

Read the rest of this entry »

Comments (2)

How to correctly make a PHP contact form

I use contact forms on many websites, and over the years I have discovered many problems with using them, including hijacking, mail injection, server hacks, XSS and platform issues.

The main cause of this is simply due to lack of validation and error checking.

Firstly you must fully understand how forms work with PHP. When you set the form “method” to POST, it sends the data to PHP as a super global variable called “$_POST”. In the HTML each “input” has a “name”, that is used to identify the related data.

For example, there is an input field named “message”, to retrieve this in PHP you simply use “$_POST['message']“, we will be using this method to pass the data between the form and PHP for processing.

This is a fine example of how NOT to do it, so what is wrong with this method you may ask?

Here are some of the issues we need to overcome:

  • Data directly input into the mail() function without processing
  • Does data from input fields contain malicious code
  • Check user input is not empty
  • Validation on user inputs
  • If the email address the user entered is real
  • Whether the email successfully sent or not
  • Ensure the correct data is processed
  • Which website the form was sent from
  • The IP address of the sender
  • Display the form at appropriate times
  • Append additional fields to the end of the message

Download here: PHP Contact Form by HM2K v1.0.1

The comments I have made within the code explains the reason what it does, and why it is included.

I hope this solves some of the problems people experience with contact forms.

Additional Notes:

  • phpro.com offers further details on User Input Validation, ideal for more advanced forms.
  • In this example I have not used tableless CSS friendly forms, just keep the focus on the PHP.
  • You may also wish to add a captcha security code for added anti-spam protection.

Comments

Windows Genuine Advantage Removal

First of all for those that don’t know, Windows Genuine Advantage or WGA is a peice of software released by Microsoft to validate your copy of windows when using services such as Windows Update or Download Center.

Due to the fact that these days you are required to keep windows up-to-date it is a good idea to satify the WGA notification.

However, because of the concerns over whether this application is infact a form of spyware due to the data it collects and sends back to Microsoft, also due to the fact that once you have established that you have a (il)legal version of Windows there is no longer any requirement to have the software installed.

Therefore Windows Genuine Advantage Remover software was created.

Once you have run RemoveWGA.exe and rebooted, before long you will be asked to install new Windows Updates. At this point you can simply choose custom on Windows Update, and de-select the Windows Genuine Advantage update, Windows Update will then ask you if you do not want to install this again in the future, you simply select no. This will be the end of WGA, and your windows updates will continue to function as before.
There are many other ways to remove the WGA however this is the most effective.

If you still have questions the Wikipedia has more information about the Windows Genuine Advantage.

Comments (3)

« Previous entries Next Page » Next Page »